I find a height-adjustable chair or stool an essential accessory when observing. The longer you look through the eyepiece the more you see. This is especially the case for clusters and galaxies. I would also find sketching impossible without a chair.
The Lybar
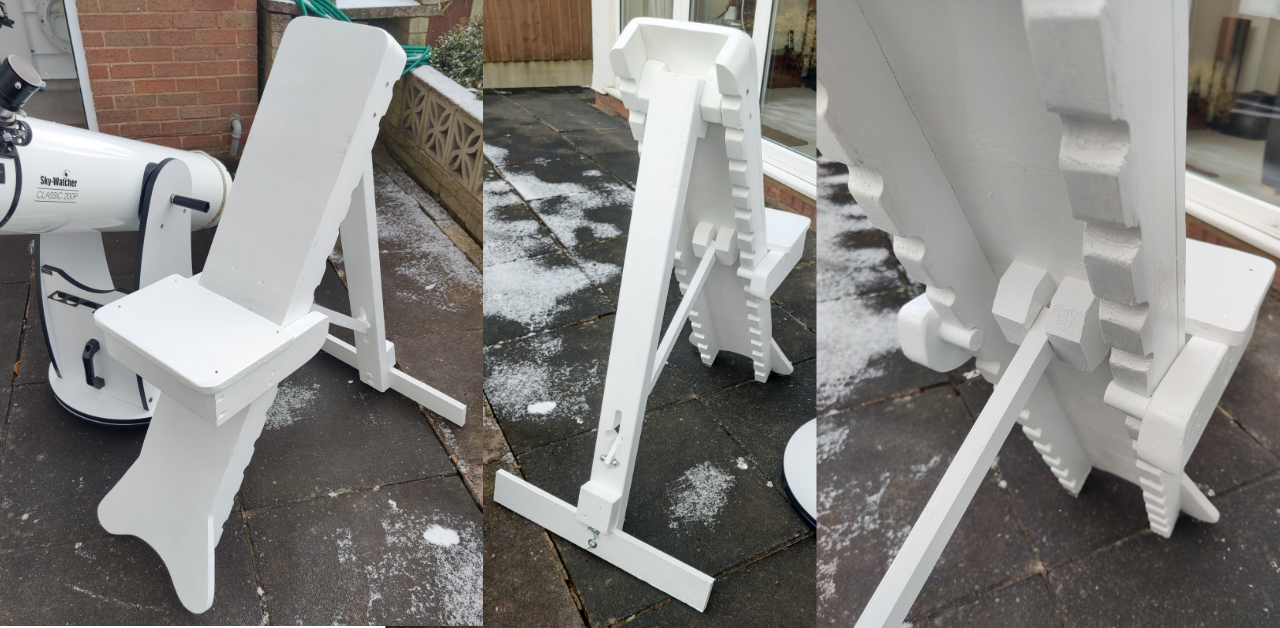
Simple, lightweight and cheap, the Lift Your Butt and Rotate seat is made from a single piece of pine and is now my throne of choice.
It is rotated to provide three different observing heights.

After making and using the small version below for a few months, I found the maximum height wasn’t enough when the eyepiece was furthest from the ground. Therefore, I made a longer, wider (for comfort as well as strength) and stronger version using 25mm wide wood.
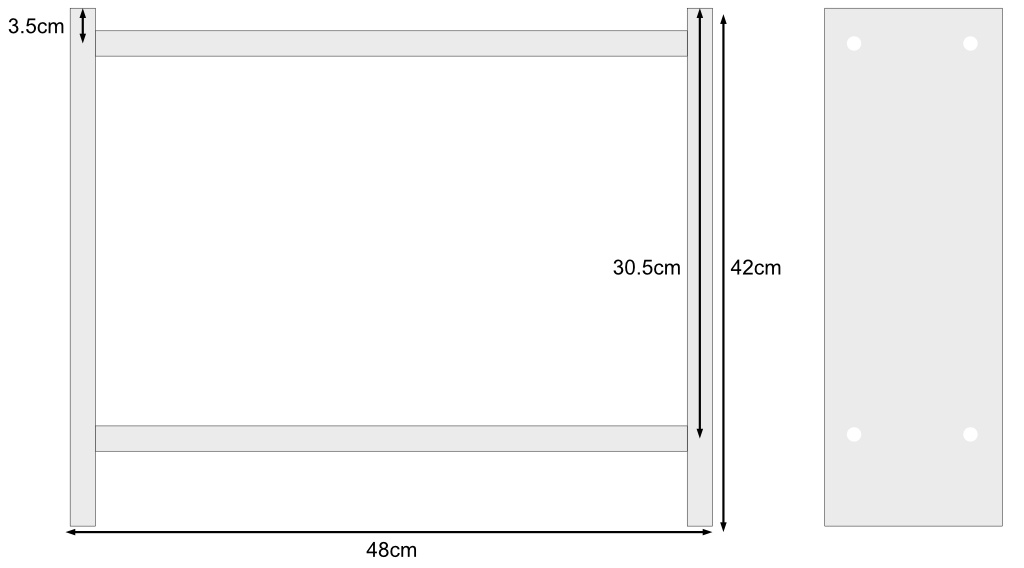
Parts: 25mm x 200mm (actual size is 20.5mm x 194mm) planed square edge redwood/pine cut into 2 x 580mm and 2 x 550mm lengths. The shop I bought it from cut the wood into the exact length. I used sandpaper to smooth the edges.
8 x modesty blocks, 8 x 60mm screws, 24 x 30mm screws, White primer and spray paint. Total cost less than £20/$26 not including paint.
Tools: Set square, ruler, drill, screwdriver, 4.5mm drill, countersink bit.
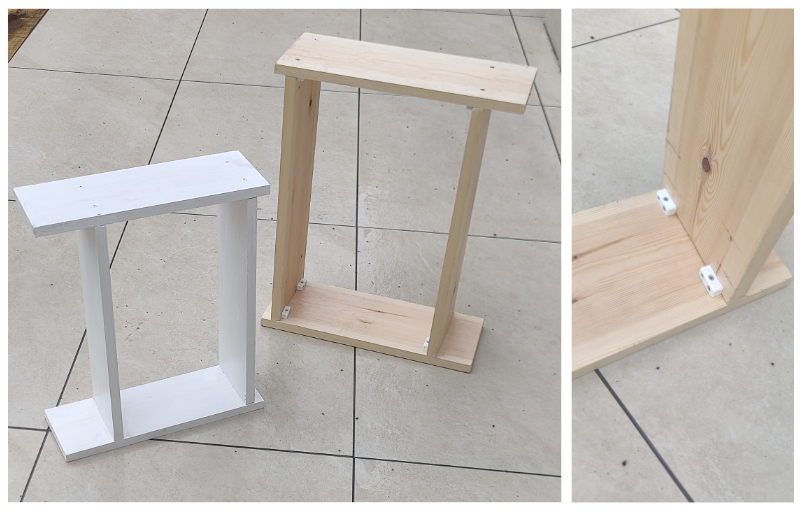
Mark out and drill the holes on the short (important!) lengths of timber as follows. Countersink the holes that face out.

Carefully, place one of the edges of the the longer lengths of wood beneath the two holes of the shorter length ensuring it is centred. A workmate/vice is helpful here. It is also important to ensure the screw enters the centre of the wood edge (12.5mm) so take your time aligning the two pieces of wood before fitting the two longer screws. Repeat the process for the other side of the shorter length. Then turn over the frame and repeat the process until all 8 screws are fitted and tight.
Place a modesty block about 20mm inside the frame and use the 3 smaller screws to secure these. Repeat for the other three blocks.
Finally, apply an undercoat and paint the frame – spray paint gives a much tidier finish.
Enhancements: Place velcro on the three seating positions and fit a removable cushion, Put rubber on the end of the flat surface that touches the ground to protect it.
Small Lybar
The small version is 20.5 x 144 x 1800mm pine purchased from Wickes for just under £10. A jigsaw is used to cut the plank into four pieces, 2 x 42cm and 2 x 48cm. Four holes 35mm from the edges are drilled into the 42cm lengths and long counter-sunk screws are used to join them to the 48cm lengths. A coat of white undercoat followed by a coat of white gloss was applied to finish the job.
Collapsable Camping Chair
A cheap and lighter option is a collapsing camping stool attached to an inverted bucket with pieces of high-strength Velcro. Total cost less than £20/$26. After a period of use, I noticed that it lacked stability on its highest setting so I am careful about using it.


Denver Chair
The homemade Denver chair folds flat and doesn’t take up a lot of room when not in use. It is comfortable and sturdy but as a consequence, it is heavy with the base being 9Kg and the seat 3Kg.
Dave Trott’s Instructions for making a Denver chair
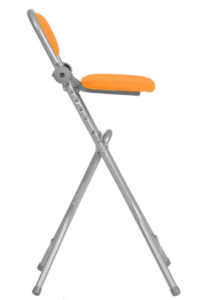
Ironing Chair
Another cost-effective option is to use an “ironing chair” or “ironing support”. These are available online for £35 to £50.
Hi Brett!
Great blog! You’re chair looks great, do you have any plans for it? I can’t seem to find plans for a Denver observing chair any where on the internet! Yours looks incredibly well built, well done!
Ed
Thanks for the comments Ed. There are two links on the page where you will find instructions for making the chair. Best of luck.
Hi, how exactly you use velcro for connecting the bucket to the chair? Could you please post a closeup? Thanks.
I’ve added a picture that shows the high strength Velcro tabs, I used. The tabs are actually too long and could be shortened as they don’t need to extend beyond the bucket.
So, it seems you have stuck velcro tabs on the bucket circumference facing up and corresponding velcro tabs on the base of the stool facing down and then you join them, correct? What velcro strips you used, something from 3m?
That is correct. I used Industrial Strength Velcro Heavy-Duty Self Adhesive Velcro Tape 20mm 2cm Wide (1m) cut into small pieces but it might have been better to have used longer pieces that approximately followed the circumference of the bucket. This is what I’d do if I were repeating the procedure.
Hi Brett,
A very creative and simple solution… Bravo! I looked at these telescoping seats on Amazon and was impressed… Just not as tall as I thought may be required… I looked through nearly of them with largest height being 20.5″. I sat and racked my brain for a few hours about how to adapt this product. Low and behold, you provided the simple solution. Meanwhile, I had a Home Depot bucket sitting just 2′ away from me!!! LOL! I gotta remember not to overthink these things! Well done!
LYBAR😊
Thanks for that, it’s on my DIY list.
Ed, NGC 1502 on SGL
Thanks! I shall buy a bucket shortly. I have the camping stool and was disappointed at how short it was but here you have solved it.
Thanks. Great idea. I have the camping stool and a bucket is a perfect way to make it all higher!
It is great to hear that you found the tip useful. Clear skies!