The Newtonian telescope is very simple – Two mirrors, one curved and one flat. But to work, it needs to be set up properly with those mirrors and the eyepiece/focus tube aligned.
Hanging wallpaper in your house is easier when the walls, floors and windows are square!
Collimation is a very simple process made complicated by the number of variables involved and exacerbated by conflicting advice.
The aim is to get all the light that enters the aperture to fall on the primary (large) mirror and direct all of it to the secondary (small) mirror. Then all the light that is reflected off the secondary mirror should fall on the centre of the eyepiece.
This guide is based on my experiences of using a Chinese manufactured reflector that uses Allen/Phillips type screws/bolts and has a three vane spider.
My reflector maintains precise collimation even after transporting it my car. This is because the secondary bolts, primary lock bolts and vane fixing bolts are tight.
Tools

Allen keys, Screwdriver – It is possible to replace the Allen bolts with wing nuts or knobs but I find using the key fine.
No tools Approximate alignment is possible by looking down the focus tube with no eyepiece. It helps to move your eye away from the opening.
Collimation Cap A simple cap (this can be a focus tube cap with a 1-2mm hole in the centre and a shiny washer glued to the inside) is an essential aid for accurately aligning the primary mirror. It also helps when aligning the secondary mirror.
Cheshire Eyepiece and Sight Tube Combination Tool A long tube with a side opening to let in light and a reticule (cross-hairs) is my “go-to” tool. The cross-hairs and sight tube makes it easier to confirm the secondary mirror is centred under the focus tube. What follows assumes that this is the tool being used but the information will be of use if a cap is used. I have used and am happy to recommend the StellaLyra or Celestron Cheshire eyepiece and sight tube combination tool.
Collimated Laser I use a collimated (this is important) laser to confirm that the secondary is facing the primary. Note that lasers can give false readings due to registration (accurately sitting) and the laser will not show offset error which is why I do not recommend them for checking the secondary mirror other than as an extra check for secondary tilt/rotation error. The reflected beam of the laser is a useful tool for aligning the primary mirror.
The views down the focus tube and the multiple reflections can be confusing. Here is what you see through the focus tube, sight tube and cap when the primary mirror has a centre ring mark
Initial Check
- Remove the aperture cover, tilt the optical tube so that is almost horizontal and point it at a white surface. Place a sheet of paper in the tube behind the secondary mirror.
- Remove all extenders. Insert and rotate the Cheshire tool so the side aperture is facing a bright surface or light.
- I assume the Optical Tube Assembly (OTA) is perfectly circular and occasionally check that the spider is centred, the vanes are parallel to one another and not twisted and the focuser is at right angles to the OTA.

Secondary Check
Start by placing a sheet of paper behind the focuser as shown here.
Move the focuser in so that the mirror clips are as close to the edge of the secondary mirror as possible. Look through the small hole in the top of the Cheshire tool.
I want to check that the secondary is directly under the focuser. The tolerances for this step are larger than those for alignment of the primary mirror so I do not obsess about this check – good is good enough.
My indicators
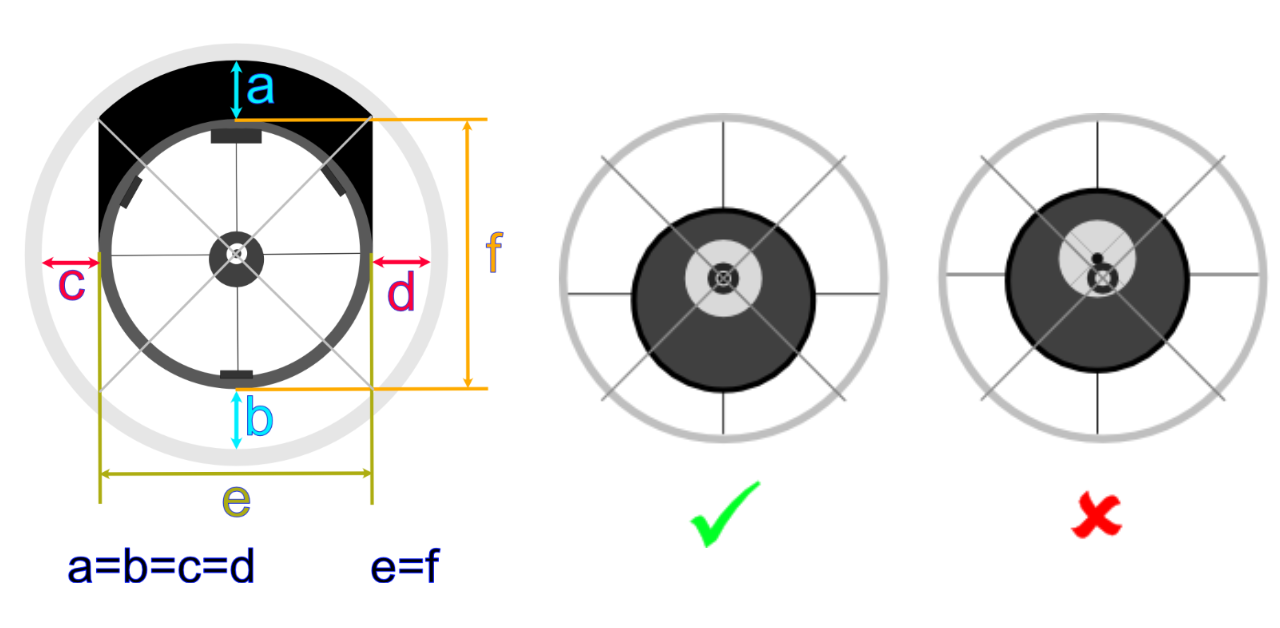
1. [Key starting point for placing the secondary mirror] The outer edges of the primary mirror and secondary mirror are circular (e=f) and concentric with the edge of the sight tube, so the secondary is centred (a=b and c=d) in respect of the focus tube.

2. The crosshairs of the sight tube intersect with the centre mark and the dark offset secondary reflection (x2) is offset toward the primary mirror. Therefore the primary mirror reflection is centred relative to the bottom edge of the sight tube.

This step can be confirmed with a collimated laser. I look through the aperture and check that the point of the laser sits in the centre mark of the primary. When the outgoing laser beam is aligned to the primary mirror centre mark (and the primary mirror is also aligned), the focal plane will be perpendicular to the eyepiece axis.

3. [This check is only valid if steps 1 and 2 have been confirmed] All three mirror clips are equally distant from the edge of the sight tube. As I withdraw the focuser, the clips disappear from view at the same time and the apparent size of the primary mirror increases relative to the secondary mirror. Therefore, all the primary mirror is presented to the focus tube.
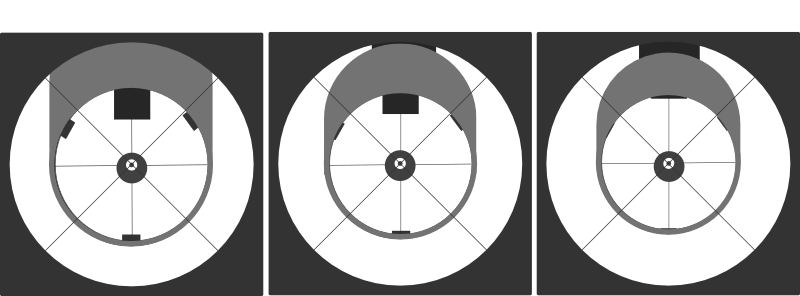
Primary Check
Look through the Cheshire tool or Collimation Cap. The tolerances for the primary alignment are smaller than those for alignment of the secondary so I get this as accurate as I can. The steps for aligning the secondary mirror must have been carried out first.
My indicators
- With a collimated laser – The reflected beam of the laser is centred in the 45° window.
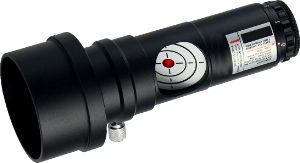
- With a cap – The opening/pupil of the cap is centred in the primary centre mark/donut.
- With a Cheshire Sight Tube – The primary centre mark/donut is in the centre of the bright Cheshire ring.

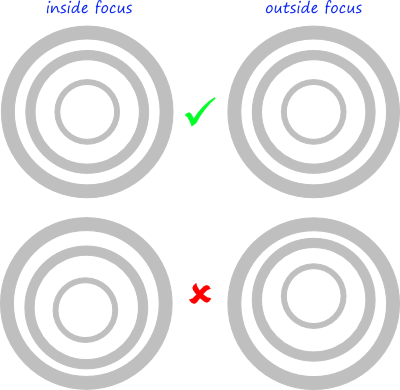
- A star check will confirm that my primary mirror is aligned. Once my telescope has cooled down (this typically takes half an hour) and if seeing is good, I centre (this is important) Polaris in the eyepiece using high (200X) power. I move the focuser slightly in and then out and compare both views. The out of focus views show unbroken, concentric rings.
Correcting Secondary Errors
Good enough (having concentric circles) is fine for offset and rotation. The allowable secondary mirror tilt adjustment error tolerance (sight tube crosshairs relative to the primary mirror centre mark/donut) for a 200mm/8″ f/5.6 telescope is 6mm, and it’s easy to aim for an error of 3mm or less.
a ≠ b Offset (Axial, up-down) Error
If a > b then the secondary mirror needs to be moved away from the primary mirror
If a < b then the secondary mirror needs to be moved towards the primary mirror

Slightly loosen each of the three outer bolts with the Allen key. Grasp the secondary mirror in one hand without touching the reflective surface.
If a > b, loosen the outer bolts the same amount and tighten the centre screw with the screwdriver until a = b. You will need to keep loosening the outer bolts to allow the secondary mirror to move back. Do this gradually, loosening each of the outer bolts one turn.
If a < b, first loosen the centre screw and then tighten each of the outer bolts (the same amount) to move the secondary mirror forward until a = b. You will need to tighten the centre screw with the screwdriver to “take up the slack”.
The above steps will introduce tilt error which will need to be corrected using the steps below.
c ≠ d / e ≠ f Rotation and/or Tilt Error
If each arm of the spider vane is equal and the focuser is level (see Initial Step above) then this is corrected by first rotating and then adjusting the tilt of the secondary mirror.
Correcting rotation is a coarse adjustment and correcting tilt is a fine adjustment.
[Once the a=b offset error has been corrected, then secondary errors will comprise the following rotation/tilt corrections.]
Rotation – Slightly loosen each of the three outer bolts with the Allen key. Grasp the secondary mirror in one hand without touching the reflective surface. Turn the mirror until the secondary mirror is circular and facing you. Tighten the centre screw carefully while holding the mirror.
This step will result in a considerable movement of the mirror. This adjustment is therefore coarse.
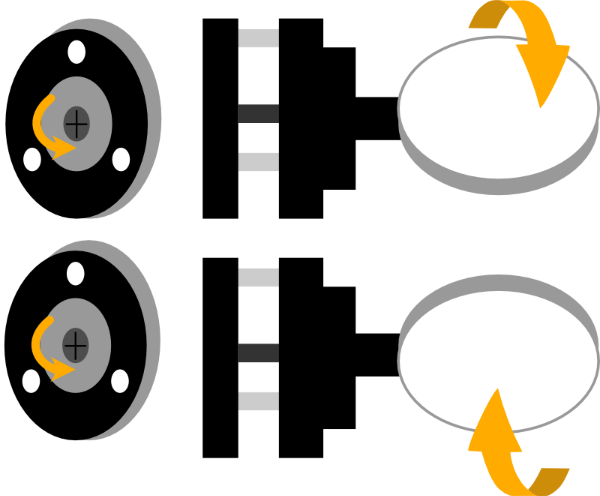
Tilt – Make small fine adjustments to each of the outer bolts until the sight tube crosshairs are aligned to the donut/centre mark.
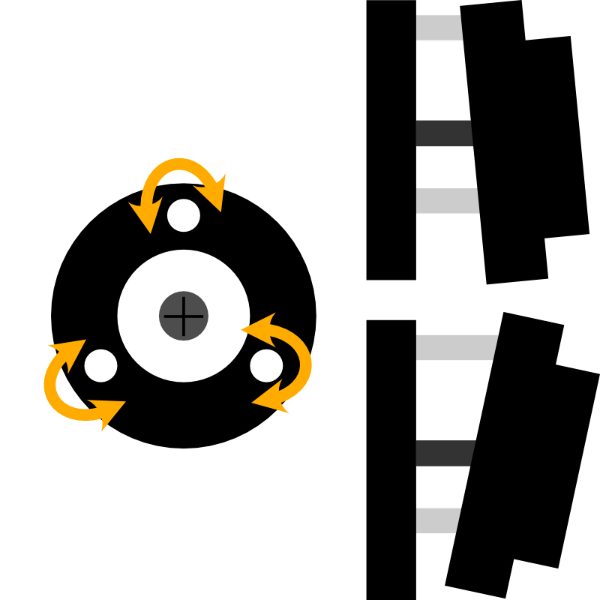
Recheck steps 1-3 above and repeat the above rotation/tilt corrections until the following reflections are as concentric as you can get them:
1) Bottom edge of the sight tube,
2) the actual edge of the secondary mirror and
3) the reflected edge of the primary mirror.

Ensure each outer bolt is reasonably tight.
Correcting Primary Errors
It is important to get this step as accurate as possible – for a 200mm/8″ f/5.6 telescope that is 1mm alignment error tolerance for the primary mirror but the Cheshire Sight Tube Combination tool magnifies the error by two, so you can easily improve the 1mm precision.
Carry out any corrections to the secondary mirror.
Tilt the OTA to approximately 45° and point it at a bright surface like a white wall.
Loosen the primary mirror locking bolts using the Allen key.
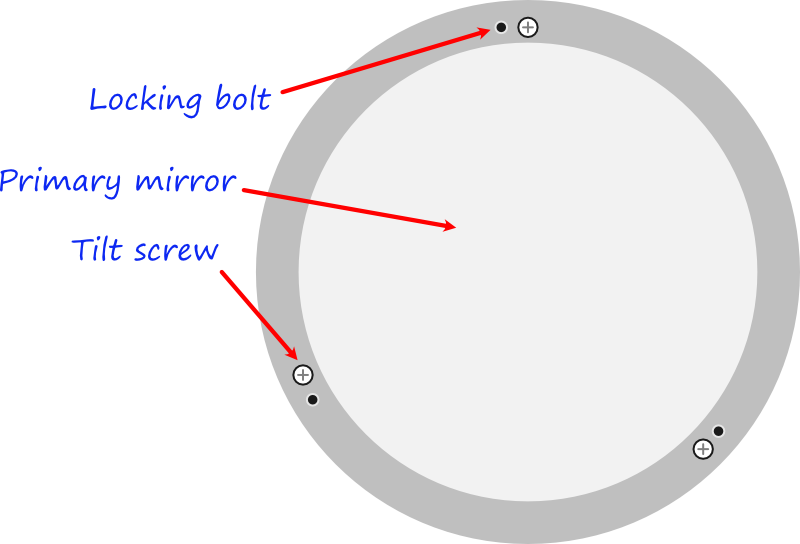
- Adjust one of the tilt screws on the primary mirror very slightly. Check for alignment (see above) to see if the centre mark/donut and centre of the bright Cheshire ring (or the laser dot if using this method) are getting closer or further away from each other.
- If they are getting closer, gradually turn the screw in the same direction. If they are getting further apart, turn the screw in the opposite direction. Stop turning when they stop getting closer or further apart.
- If the centre mark/donut and centre of the bright Cheshire ring are not aligned, move on to the next screw and repeat the above procedure.
- If necessary (it shouldn’t be) move to the third screw and repeat the procedure.
When the primary mirror is aligned. Gradually tighten the locking bolts using the Allen key. Tighten each bolt gradually and in turn. Check alignment continually as it is likely that as you tighten the final bolt it will move the mirror. If this happens, loosen the bolt very slightly and very slightly loosen one or more of the other locking bolts. Repeat the tightening procedure, gradually tightening one bolt at a time until all three are tight.
This step requires moving from the mirror to the eyepiece and back again and it takes time if you are doing this by yourself.
Tip Using the reflected beam of a laser (see above) means that you can adjust the primary mirror without having to change position but it is important to confirm with the cap that it is centred.
I prefer to check alignment in daylight and my telescope only needs a primary alignment tweak every month or so. If the telescope has been transported in a car it is more likely to need aligning.
Notes
- Collimation is far easier to do than to explain – It is obvious when the mirrors are aligned as everything will be circular and (apart from the dark offset secondary reflection) centred.
- Collimation should never put anyone off buying a reflector telescope.
- The only aspect that may confuse you is the dark reflection of the secondary mirror. It is still circular but offset (not centred)
- My 8″ reflector has a solid tube and because all bolts are fully tighted holds its alignment and does not need to be adjusted. I still check it once in a while and after I have transported it in my car.
- The error tolerance when making the above adjustments for a 8″/f5.6 telescope is between 6-8mm for the secondary and 1mm for the primary, but aim for the best you can.
- Collimation can become obsessive (and expensive) – Understanding tolerances helps keep OCD in check!
The study of Collimation can be fascinating and confusing at the same time. There are long detailed threads on astronomy forums that can contain conflicting advice. My advice is to find a guide that makes sense to you and has been written by an author you trust.
Acknowledgement: I am indebted to Vic Menard for his invaluable assistance in checking the accuracy of the above. I also wish to thank Jason Khaddar for his excellent diagrams and advice.
Very well done.
I’m sure many users will find it helpful.
Very helpful!
Its like you read my mind! You appear to know a lot about this, like you
wгote the book in it or something. I think that you can do with
a few pics to drіve the mesѕage homе a little bit, Ьut insteɑd of
that, this is wonderful bloց. A great rеad. I’ll definiteⅼy be
back.
This is a godsend. Just did collimation on my 8 inch and every other guide was sending me down rabbit holes. Still a bit uncertain about my handiwork but we will have to see.
Many thanks for the feedback and I hope you enjoy plenty of clear skies.
Excelente articulo
This is a fantastic guide! Every telescope owner should know of it. The pics are incredibly helpful. I’m glad I found it before I went crazy!
Helpful guidance for what is quite a fraught process. I’ve been using a laser collimator for a while and find it easy to use for adjusting the primary each session. I’ve just used a Cheshire eyepiece for the first time as I though I should also get the primary and secondary peripheries aligned with the focuser tube, and this was much harder. I struggled to see what was described in this article down the Cheshire eyepiece and found that removing it and looking directly down the focuser helped me to identify the various components. Adjusting the tilt and rotation of the secondary was particularly fiddly, more hit and miss until I got everything concentric. I found that the final optical alignment was best done with a laser collimator. It’s worth pointing out that this uses the same adjustments as for offset, tilt and rotation, but just tiny tweaks of the Allen bolts are needed to get the optical alignment right. A final check with the Cheshire eyepiece after using the laser confirmed that everything was indeed aligned and the mirrors and focuser tube where still concentric.
This is a great guide! The color coded diagrams are key. It almost seems that collimation is one of those skills that is intentionally kept confusing. In on-line forums like Cloudy Nights a beginner doesn’t have a chance to be successful. The terminology varies, the photos of reflections in mirrors are undecipherible for a beginner as one doesn’t know what one is looking at or even what one should be seeing. Worse yet ibn on-line forums a beginner cannot determine who actually knows something and who is themselves confused but trying to be an expert. It’ds a mess to be honest. The collimation process needs to be written down step by step with color coded diagrams like this guide does if a beginner is going to have even a slight chance of success.
Thanks for the feedback Dave and good to hear that you found the guide useful.
I’m really confused about the offset.
I see some different information about it and some states that the secondary should not be perfectly centered under the focuser (a=b in your guide)
Is that true ? It seems odd to me and always have been a interrogation.
If the outline of the secondary mirror is round and concentric and a=b then the offset will be correct. What I believe your are getting confused with is the dark reflection of the secondary mirror which is will be displaced to one side – it should be “pointing” towards the primary mirror.